


2002-2008 Sea Ray 240 Sundeck Swim Platform Teak Deck Floor Mat
Estimated Delivery between Enero 03 and Enero 21.
2006 Sea Ray 240 Sundeck EVA Foam Teak Deck Floor Mat
Application Guide:
2002 searay 240 sundeck
2003 searay 240 sundeck
2004 searay 240 sundeck
2005 searay 240 sundeck
2006 searay 240 sundeck
2007 searay 240 sundeck
2008 searay 240 sundeck
Notes:
Please confirm your boat type before adding to cart. If you are not sure if it fits your needs, you can contact us online or send us an email to confirm the size.
If you want to add logo or pattern, you can send JPG image to our email, we will design the pattern and send it to you for confirmation, of course you need to pay extra fee.
Description:
Material: EVA foam
Texture: Brushed / Embossed (Default Brushed)
Thickness: 6mm
Hardness: 60°- 65°
UV: ≥4.5G
Adhesive: 3M99786 (3M Self-Adhesive Backing - No need to buy glue)
If you need other colors, you can email eric@hjdeck.com, we are a factory and can realize the colors you want.
For Design:
1. We can design drawings according to customers' requirements (free of charge).
2. We can provide design drawings for your choice.
3. Support LOGO customization, need file, format file: DXF/AI/PDF/JPJ/PNG, etc.
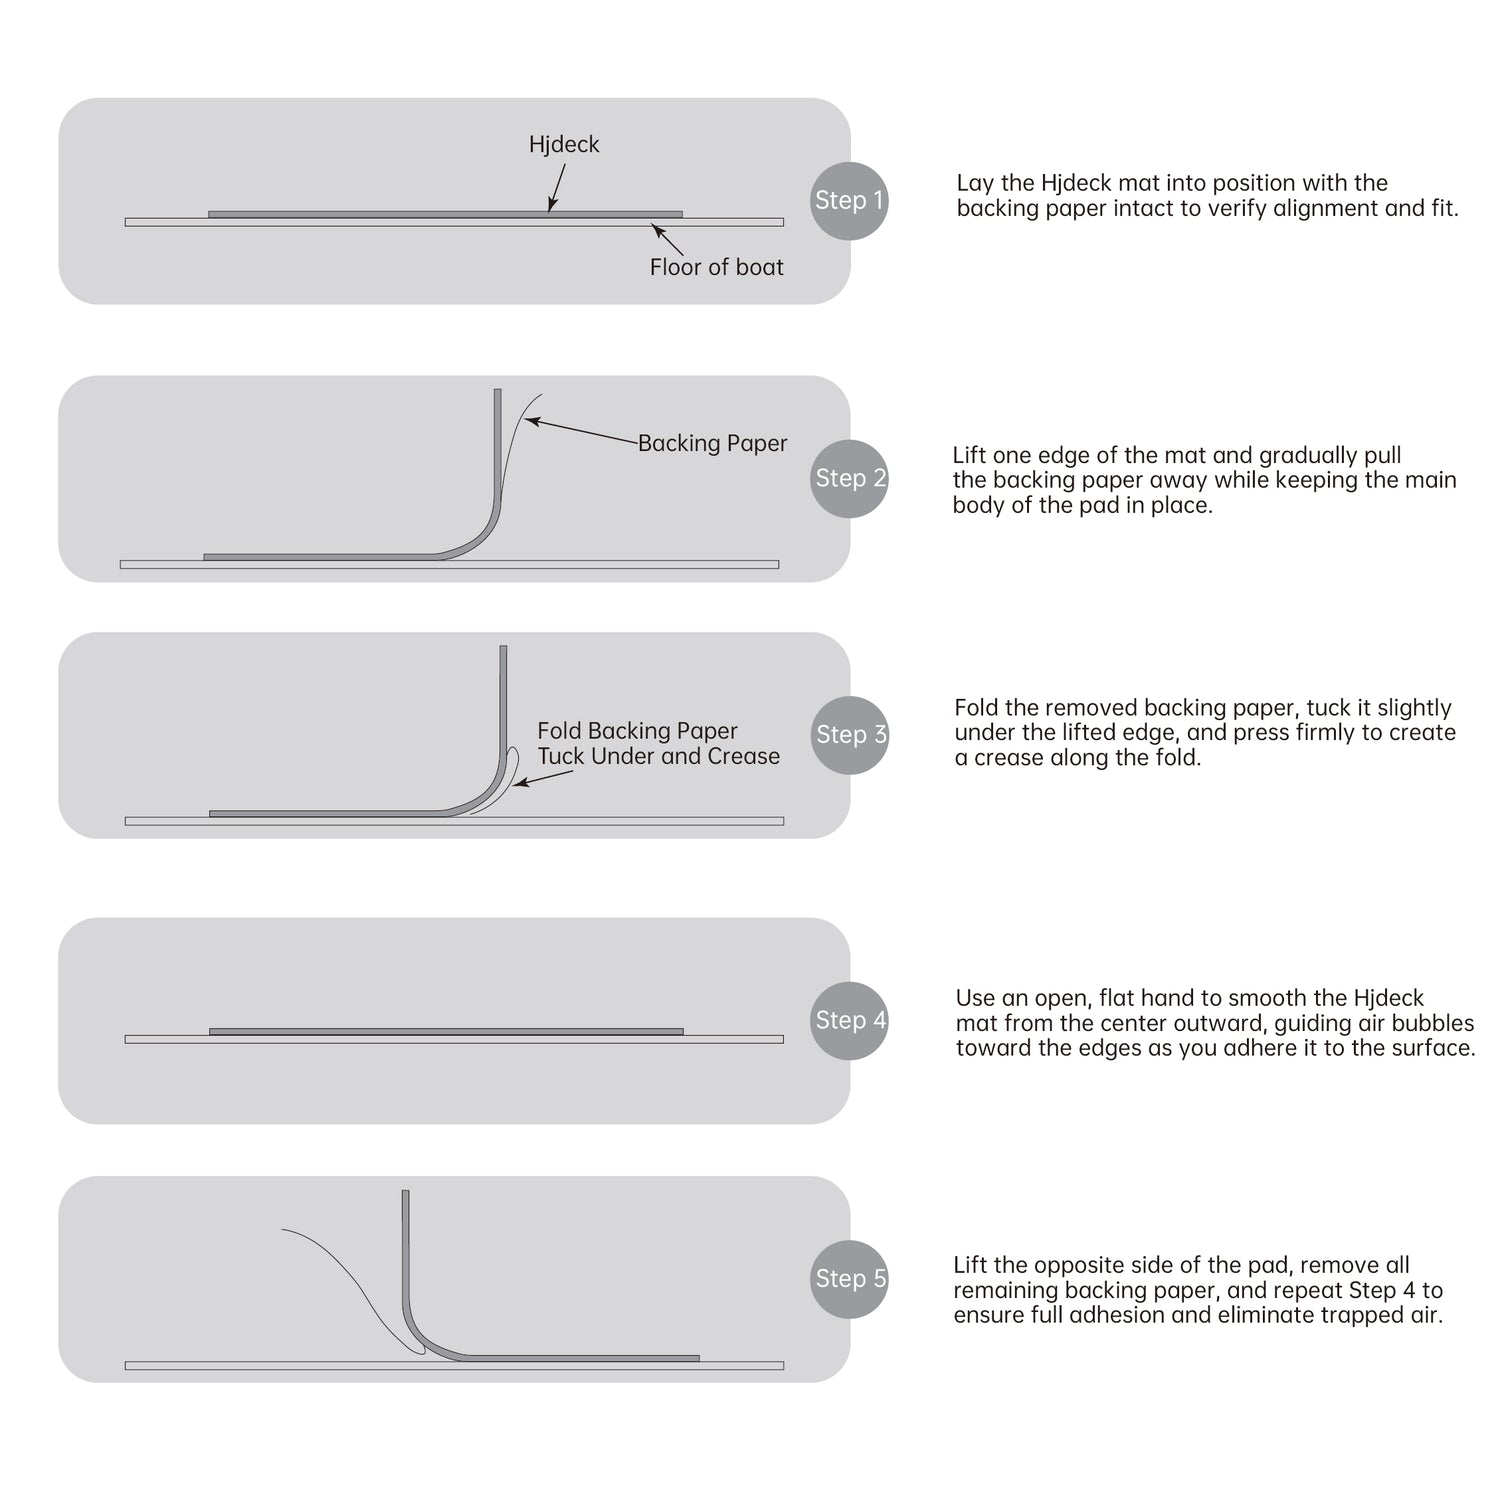
Installation Notes:
1. Before installation the floor needs to be cleaned with acetone or alcohol (to remove the wax from the surface of the new boat) and make sure it is dry before starting the installation.
2. Lay all EVA flooring flat before installation. After confirming the position, tear off the adhesive backing on one corner and start the installation.
3. Fix the adhesive and do not move the EVA flooring.
4. Use the round wheel to roll during the installation process (you need to press the 5. LOGO position with your finger in advance to avoid air entry). If there is air generated, a small needle can be used to puncture the bubble exclusion.
Note: 48 hours after installation shall not be immersed in water.
Making Templates:
If we don't have a matching boat in our sales list, please provide us with a template and we can manufacture it according to your template requirements. More details of customized templates are available: https://www.hjdeck.com/pages/custom-features#section6
Delivery
Please ensure that your shipping address is entered correctly and completely at checkout.
This includes the correct use of abbreviations, street numbers, building or apartment numbers, and route information (if applicable).
We are not responsible for lost, misplaced, or incorrectly delivered shipments resulting from incorrect or incomplete address information provided by the customer at the time of purchase.
Order Processing
Orders are typically processed within 1–5 business days after order confirmation.
Please note that business days do not include weekends or public holidays.
Except for sheets:
• Production: 3–5 business days after order confirmation
• Custom orders: 5–7 business days
• Shipping: 1–2 weeks after shipment
Shipping
After shipment, delivery generally takes approximately 7–15 business days, depending on the destination country and shipping carrier.
Total Time:
Total delivery time = production time + shipping time.
Please note that shipping time does not include production time.
For more detailed information, please refer to our Shipping Policy.
If you need to return an item, please email eric@hjdeck.com.
· Sheet items are eligible for return or exchange within 30 days of receipt.
· Kits and custom items are not eligible for return.
If HJDECK makes an error in processing your order, we will provide a return label free of charge. Otherwise, the customer requesting a return will be responsible for return shipping costs.
If the item or packaging is damaged or used. we will charge a 30% restocking fee for items already ready to be shipped.
Approved refunds will be credited to your bank account within 15 business days of HJDECK receiving the returned item.
If your return is accepted, we'll send you a return shipping label, as well as instructions on how and where to send your package. Items sent back to us without first requesting a return will not be accepted.
Note:
1.We cannot accept returns on sale items or gift cards.
2. Shipping fees are non-refunda
Please Note:
Due to differences in monitors and device settings, actual product color may vary slightly from the image.

Custom
1. Before installation the floor needs to be cleaned with acetone or alcohol (to remove the wax from the surface of the new boat) and make sure it is dry before starting the installation.
2. Lay all EVA flooring flat before installation. After confirming the position, tear off the adhesive backing on one corner and start the installation.
3. Fix the adhesive and do not move the EVA flooring.
4. Use the round wheel to roll during the installation process (you need to press the
5. LOGO position with your finger in advance to avoid air entry). If there is air generated, a small needle can be used to puncture the bubble exclusion.
Note: 48 hours after installation shall not be immersed in water.

1. We can design drawings according to customers' requirements (free of charge).
2. We can provide design drawings for your choice.
3. Support LOGO customization, need file, format file: DXF/AI/PDF/JPJ/PNG, etc.
For custom requirements, please contact eric@hjdeck.com.

1. If we don't have a matching boat in our sales list, please provide us with a template and we can manufacture it according to your template requirements.
2. You can check out our custom template guide to see what tools you need and what to mark: https://www.hjdeck.com/blogs/news/creating-a-template-for-your-custom-hjdeck-kit
How to make a template: https://www.youtube.com/watch?v=hPBZlYoOmDg
3. More details of customized templates are available: https://www.hjdeck.com/pages/custom-features#section6
Pattern Design Drawing


Share contact information, store details, and brand content with your customers.
Contact: eric@hjdeck.com
Share contact information, store details, and brand content with your customers.
Contact: eric@hjdeck.com